How to write an API REST point in Phoenix
by Alexandre Dedourges, DevSec
You may have already heard about Phoenix Framework on the web. Indeed, it is a framework that is gaining in popularity as time goes by. Why? Simply because it offers speed and productivity to people who use it. Although it may seem counter-intuitive, this is what this powerful tool offers. Now you might be wondering what this framework is and what it is used for? This article is for you! However, you should know that it is a very practical tool that will also allow you to use API (Application Programming Interface) points in your projects very simply. Like the Order of the Phoenix fighting for HAPI Potter, Phoenix Framework is fighting for easier to use APIs!
Phoenix Framework for smooth and fast applications
Phoenix is a web development framework. It is written in Elixir, which is a multi-paradigm programming language (a paradigm being a way to approach computer programming). It runs on Erlang virtual machine (BEAM) which allows applications written in Elixir to work. Its creator, José Valim, wanted to create a programming language for large-scale sites and applications. It was created to take full advantage of the multi-core processors that began to be fully democratized in the 2000s. It is particularly used to create low-latency and fault-tolerant distributed systems.
Phoenix takes full advantage of Elixir's strengths, which makes it a powerful tool for development. This framework implements the MVC (Model View Controller) model on the server side. MVC is a software architecture pattern for graphical user interfaces that is very popular for web applications. It is composed of three types of modules with three different responsibilities: models, views and controllers.
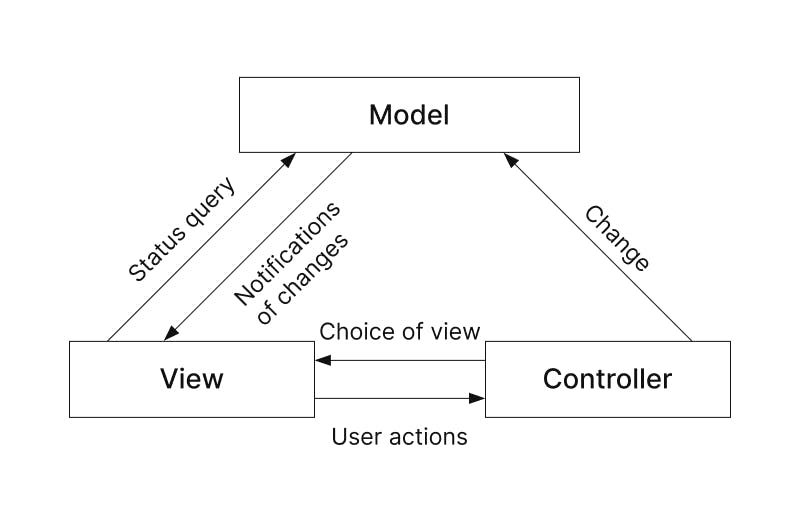
MVC : source https://rosedienglab.defarsci.org/a-quoi-sert-une-architecture-mvc-son-fonctionnement/
This type of model allows a better distribution of tasks by separating the business logic and the display.
The strength of Phoenix is that it combines productivity and performance. Indeed, it offers a great development capacity and very high application performance.
REST APIs, the pros of communication
A REST (REpresentational State Transfer) API is an architectural style that allows applications to communicate with each other over the network or on the same device. REST uses HTTP methods. To communicate from a client to a server. The interesting thing about REST APIs is that they are universal. They work on all devices and operating systems. Most of the time REST APIs use JSON (JavaScript Object Notation) or XML (EXtensible Markup Language) for their communication, but they can also use other data formats.
Many applications already use REST APIs to communicate with each other.
Using REST APIs for your Elixir and Phoenix Framework application
Now let's see how to use REST APIs with our application in Elixir and Phoenix Framework. We are going to use a lot the 3 modules of our framework which are the models, the views and the controllers. This is the basis of any Elixir application.
To begin with, the first step will obviously be to install Elixir on your machine. Phoenix is a framework based on this language, so it is necessary to be able to manipulate and use it. If you want to know more about it, you can consult the website dedicated to it or the official documentation. For the installation it is here. To use Phoenix, it is necessary to have a basic knowledge of Elixir, if you don't know where to start to learn how to use this language, their website offers a selection of books, online courses... so don't hesitate to have a look!
Let's get on with it! Once Elixir is present on your machine and you have learned the basics, we will start by installing the Phoenix application with the following command:
mix archive.install hex phx_new

This command installs the Phoenix application in the folder where you run it. You will notice the use of "mix" which is available immediately after installing Elixir on your machine. This will have different uses in your project.
Now that our Phoenix application is ready, we will create a new Phoenix project. This project will be a banking application that will allow you to know your balance for example. To do this, use the following command:
mix phx.new bank_account

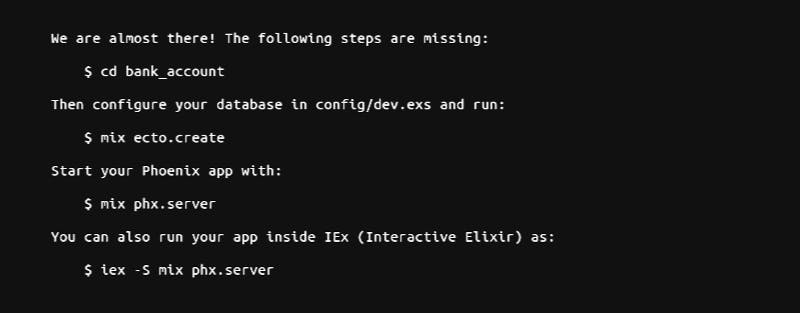
A new project is now created, it is in the form of a folder with several files and subfolders.
To fully use our application and our API points, we will need a database. To do this, you have several choices: MySQL, postgres... in our case we will use postgres, because it is the default one proposed by Phoenix. You will then need to have postgres or any other database management system installed on your machine.
To interact with our database, a very practical tool will be made available to us: Ecto. Ecto is a database wrapper and query generator for Elixir. It will allow you to manage everything related to your databases simply and efficiently.
For example, you can start by creating your first DB by typing the command :
mix ecto.create

Once this one is created, we will have to fill it. So we have to create schemas. A simple way to create a schema is as follows:
mix phx.gen.schema User users first_name:string last_name:string balance:float

This command will automatically generate a template containing the "users" schema for you. It will also create a script that will allow you to migrate the necessary information to our database. We indicate in this command that our users are characterized by a first and last name in the form of a character string and a bank balance in the form of a real number.
Another way to do this is to create a Context, this context is used to create a grouping of modules that have common features.
For example a Context Account would contain users and any other modules that could be related to a bank account. The command to use would then be :
mix phx.gen.context Account User users first_name:string last_name:string balance:float
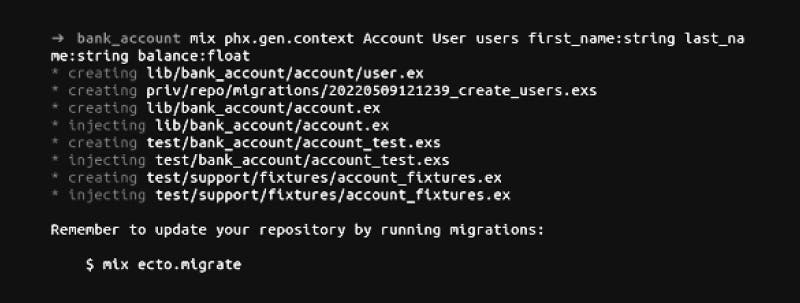
New files are then generated in our project. First, a file containing our user schema (user) and defining its fields (first_name, last_name and balance) and their type.
An Account file that gathers all the CRUD operations (Create, Read, Update, Delete) concerning the users. These operations are generated by the previous mix command without having to do anything! Quite practical, isn't it?
And finally a migration file that will allow you to migrate your schemas to the database to define what it will contain as well as test files.
To start the migration to the DB, you need to run the command :
mix ecto.migrate
Now that we have our application, our database, our schemas and our CRUD operations, let's move on to the thing that interests us: using an API to perform our CRUD operations.
From here we have two choices: use a command to automatically generate our operations and API points. Or write them ourselves.
The first option is to run the following command:
mix phx.gen.json Account User users first_name:string last_name:string balance:float –no-context –no-schema
Here we specify that we don't want to generate Context or Schema, because they are already present in our project. Next time you can simply generate your Context and Schema with this single command.
Once you run this command, your API points will already be almost ready to be used. Just add this line of code to your "router.ex" file inside the :api scope and the routes will be created.

This simple line will define your API points that can be used with your application. Here are the different routes that this line of code will create:
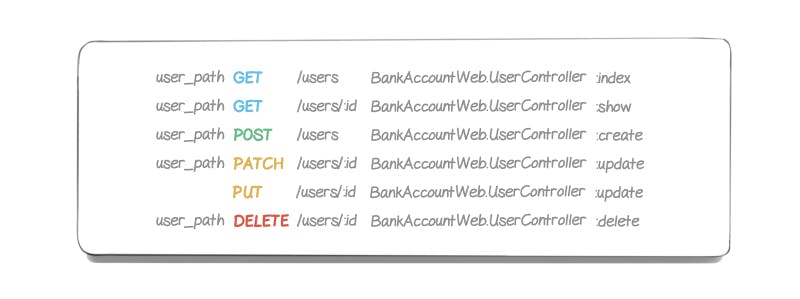
To learn more about routing, feel free to consult the official documentation.
The second option you have is to create your own functions to fit your needs.
You will then need to first go to your router.ex file and add the same line as before:

You should then have this:

Once this is done, go to your "user_controller.ex" file
You can then create the following functions:
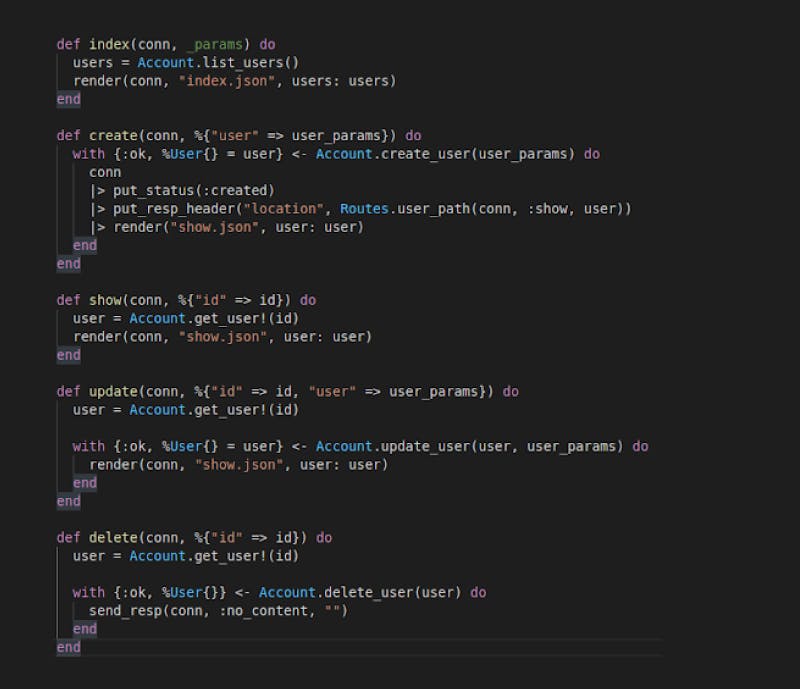
Each of your functions will be executed according to the API point you use. For example when you want to retrieve a user from his ID, you will have to use this route:

It is the show function of your Controller that will be executed.
Then, the CRUD function contained in your account.ex file will be executed. If there is no error, the render function comes into play. This function must be created in your user_view.ex file. It is in this file that you will determine how the rendering will take place.
Here is what the functions you will have to create might look like:
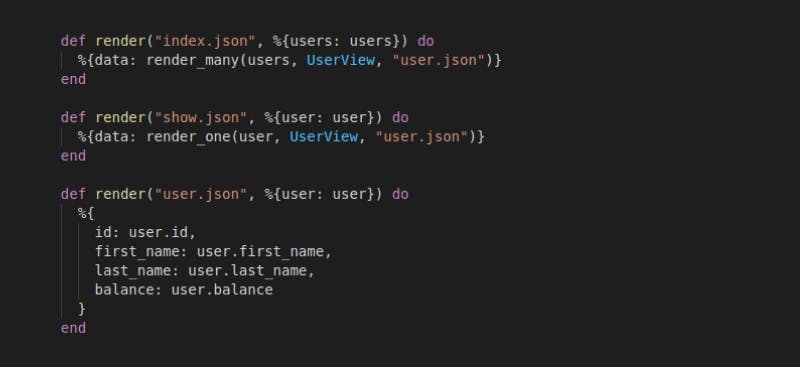
Each function here is different, although their names are the same. We will execute the one we need thanks to the pattern matching. The first render will be used to display several users. The second one will do the same, but for a single user. The third one is the one used by the first two to display each attribute of the user(s).
Once this is done, you can test your functions! If they work then your API points are ready to be used!
For example, you can use this query to display a user:

Here we create an HTTP GET request, we pass as parameters the connection and the route that our router has created for us by passing the connection, the function to execute (here show) and the ID of the user we want to retrieve and display.
You have just made your first API request!
To check that everything is working properly, you can use Postman which is a very useful utility to test your API points!
Phoenix Framework a tool that facilitates the use of APIs
As you may have noticed, Phoenix Framework is a very practical tool for creating web applications, it is also a tool that greatly facilitates the use of APIs in your projects. Indeed, with dedicated functions as well as tools that can directly generate a functional project with API points, it offers considerable time savings. Of course, for more advanced projects, you will have to create your own functionalities. Nevertheless, Phoenix provides all the necessary tools for the good realization of your project and for beginners a good start.
So ready to learn more about REST APIs, Elixir or Phoenix Framework? We tell you more at Cryptr ! Feel free to follow our latest news on Twitter and LinkedIn.
Add enterprise SSO for free
Cryptr simplifies user management for your business: quick setup, guaranteed security, and multiple free features. With robust authentication and easy, fast configuration, we meet businesses' security needs hassle-free.